To set up a static IP address for your Raspberry Pi or any other device on your home network, you’ll need to configure it in your router’s settings. Here’s a general guide on how to set up a static IP address in a typical router:
- Determine the current IP address: On your Raspberry Pi, open a terminal and run the following command:
ifconfigLook for the network interface connected to your local network (e.g., “eth0” or “wlan0”) and note down the current IP address assigned to your Raspberry Pi.
- Access your router’s settings: Open a web browser on a device connected to your home network and enter your router’s IP address into the browser’s address bar. This IP address is usually something like 192.168.1.1 or 192.168.0.1. Consult your router’s documentation if you’re unsure about the default IP address.
- Login to your router: Enter your router’s username and password to log in. If you haven’t changed the default credentials, check your router’s documentation or the manufacturer’s website for the default login details.
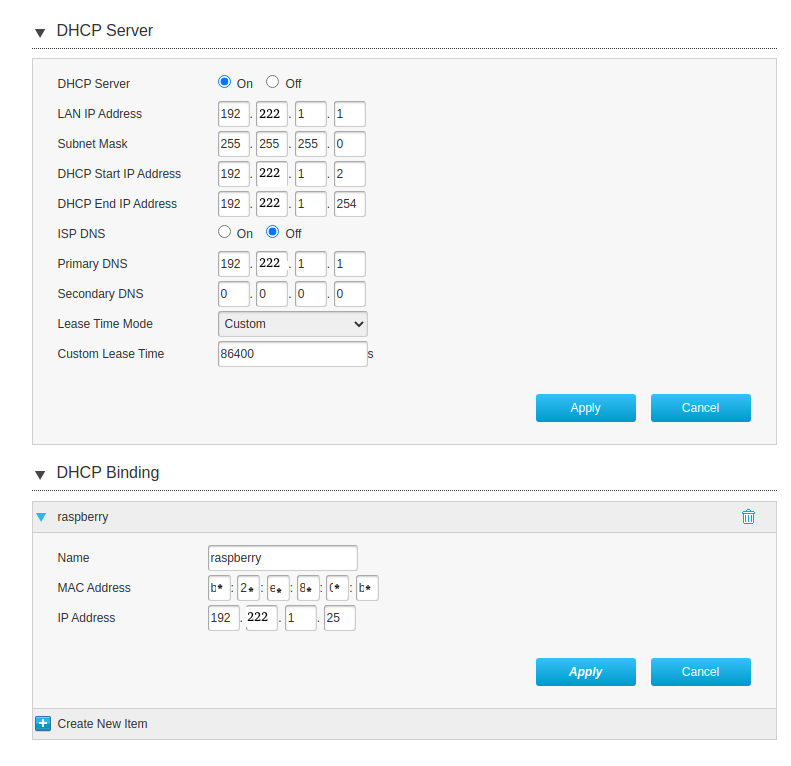
- Locate the DHCP settings: The location of DHCP settings may vary depending on your router’s interface. Look for options like “DHCP,” “LAN Setup,” or “Network Settings.” Consult your router’s documentation if you’re having trouble finding the appropriate settings.
- Reserve a static IP address: In the DHCP settings, locate the section where you can reserve IP addresses or assign static IPs. Here, you’ll need to provide the following information:
- MAC Address: The MAC address is a unique identifier for your Raspberry Pi’s network interface. You can find it by running the following command on your Raspberry Pi:
ifconfig -aLook for the network interface (e.g., “eth0” or “wlan0”) and note down the corresponding MAC address (e.g., 00:11:22:33:44:55). - IP Address: Choose an IP address that is within the range of your home network’s IP addresses but outside the range of the DHCP pool. This IP address will be assigned statically to your Raspberry Pi. For example, if your router’s DHCP pool is set to assign IP addresses from 192.168.1.100 to 192.168.1.200, you can choose an IP address like 192.168.1.50.
- Save the settings: Once you’ve entered the MAC address and the chosen IP address, save the settings in your router.
- Restart the Raspberry Pi: After saving the settings, restart your Raspberry Pi to obtain the newly assigned static IP address.
Upon rebooting, your Raspberry Pi should have the static IP address you assigned, allowing you to access it consistently from within your home network. Make sure to update any network configuration files or settings on your Raspberry Pi to reflect the new static IP address.
Keep in mind that the process may vary slightly depending on your router model and firmware. Consult your router’s documentation or manufacturer’s website for specific instructions related to your router.